20 December 2015

Zuger Kirschtorte


Back posting a little, shameful blogger, to show you what I made for December' s choice with The Cake Slice Bakers.

This is the second month with our new book Maida Heatter's Cake. I am genuinely loving this book!! I was really impressed with my last choice and I just love how the books reads. It's so straight forward and easy to understand. I do think there are some unnecessary steps, some elements don't need to be as laborious but nevertheless, it's going great!

I opted for the Zuger Kirschetorte, on page 116, and made it for Christmas Day dessert. It was fabulous, but lacked the real cherry bing in the cake layer. I think I needed double the syrup that the recipe called for. I also opted out of using buttercream to sandwich the cake.. I felt it would be too heavy after our dinner and while I am a fan of hedonism, just couldn't bear the thoughts of this being overly sweet or luscious.

This cake is such a treat! From the bottom up it is described as a layer of crisp almond meringue; a thick layer of kirsch whipped cream; a divine, light and airy, buttery sponge; another layer of thick kirsch whipped cream; topped with yet another layer of meringue, then more cream and decorated with meringue kisses.

Not for the faint hearted, definitely for the us gluttons!


Zuger Kirschtorte
adapted from Maida Heatter's Cakes pg 116

The Cake Layer

125g self raising flour
6 tbsp cornflour
5 tbsp soft butter
4 eggs and 3 egg yolks
85g sugar

Preheat the oven to 180C/ 350F or gas mark 4.
Line, the sides and bottom of a 9 inch springform pan with parchment and set to one side.
Sift the flour and cornflour together.
Cut the butter into small pieces and melt it slowly in a pan over a medium heat, set aside to allow to cool but not harden.
Put the eggs and egg yolks in a bowl and add the sugar. Whisk until the mixture increases in volume, almost tripled, it will look very pale and thick.
Sift about one third of the flour mixture into the eggs and fold in with a rubber spatula, repeat twice, gently folding in the flour.
Add the melted butter in the same way, slowly and gently folding it into the mixture, making sure you keep all the air.

Turn out into the prepared tin and bake in the oven for about 35 minutes. Once out of the oven, carefully clip open the spring form, remove the parchment and using your wire rack, invert the cake. Remove the bottom of the pan, but not the parchment.

Leave the cake upside down to cool.

Reduce the oven to 135C/275F, Gas Mark 1.

Meringue Japonaise

85g ground almonds
225g sugar
1/2 tbsp of flour
4 egg whites

Line two cookies sheet with parchment, with a pencil draw two nine each circles on each piece of parchment.
In a small bowl stir the ground almonds and 1/3 of the sugar and the flour together.
Beat the egg whites until they hold a soft shape, gradually (a few tablespoons at a time) add the other 2/3 of sugar and whisk until thick and glossy. Make sure the meringue is stiff, do not under-beat here.
Fold the almond mixture into the meringue in two additions, make sure it is evenly incorporated but do not mix more than necessary.
On your marked out parchment, create two circles using the meringue, keeping the meringue about a 1/4 inch away from the edge of the pencil line. Dollop some kisses on the baking sheets also, if you have any left over.
Pop the baking sheets in the oven for 30 minutes, rotate the baking sheets top to bottom and bake for another 30 minutes.

Turn off the oven and allow the meringue to cool in the oven completely.

Kirsch Syrup and Whipped cream

80ml of water
3 tbsp granulated sugar
80ml kirsch
500ml of single cream
2 tbsp of kirsch

Pour the water and sugar in a small saucepan and over a medium heat allow the sugar to dissolve and the mixture comes to a boil. Set aside to cool, once cooled, stir in the 80ml kirsch.

Whip the single cream to soft peaks and fold through the kirsch. Set aside.

Putting it all together...

Starting with a layer of cooled meringue, place it right side up on your serving plate. Add a thick layer of cream. Place the cake, topside down and remove the parchment piece. Using the kirsch syrup, brush it on to the cake and allow it soak through.

Add another layer of cream on top of the cake and the the remaining meringue layer. Cover the top and sides of the cake with the remaining cream and decorate with kisses.


Make sure you stop by the other bakers and see what they made... you'll find them all below!


Merry Christmas to you all!

25 November 2015

An Irish Whiskey, Pecan Fruit Loaf


Oooh poor, sad, little neglected blog! How you must think me so mean? But I have good reason... There are simply not enough hours in the day.

I did a simple maths equation. I calculated what I need to do each day and how much time each thing would take. In order to successfully accomplish, home, work, study, life, blog, fun, friends etc etc.. I need another 3 point something extra hours per day. Rounded up to 4.

I need 4 extra hours a day to do what I just need to do. Simple.

But that's not going to be happening any time soon. So some things get neglected. Sorry blog...

This cake was baked along with my baking group The Cake Slice Bakers and honoured the start of our new book Maida Heatter's Cakes. It was a simple choice this month.. I'm the only Irish baker in the group, I wasn't going to pass up the opportunity to make the Irish Whiskey Cake!


Irish Whiskey, Pecan Fruit Loaf
- adapted from Maida Heatter's Cake pg 169

450g self-raising flour
1 teaspoon baking powder
1/4 teaspoon salt
zest of two lemons
juice of one lemon
zest of one orange
juice of one orange
140g soft butter (+ 1 tablespoon for after baking)
1 teaspoon vanilla
250g light, soft brown sugar
2 eggs, separated
125ml Irish Whiskey (I used Jameson)
125g raisins
180g toasted chopped pecans

Pre-heat your oven to 180C, 350F or gas mark 4.
Line a large loaf tin with parchment.
Chop the pecans and pop them on a baking tray and into the heating oven for about 10 minutes to toast.
In a small bowl, mix the lemon, orange juice and zest together and leave to one side.
Cream your butter and sugar until soft and and sandy, then add the vanilla and the eggs yolks until mixed well. 
Dry whisk or sieve all the dry ingredients together in a separate bowl.
Alternate the dry ingredients into the wet ingredients using half a cup of whiskey at a time. 
Add the fruit mix and fold it in with a rubber spatula. 
Fold in the juice and zest.
Fold in the toasted pecans.
Whisk the egg whites until soft peaks have formed. Fold them through the mixture, being careful not to over work the egg whites.
Transfer to you lined tin and smooth out the top.

Bake in your preheated oven for up to an hour. Check it from 50 minutes on. Cover it loosely in tinfoil to stop it over browning on the top if you want to. 

A skewer when inserted in the middle should come out clear or clear-ish. It's a moist cake, you might get some crumbs! Once the cake is out, smear that extra tablespoon of butter on top and allow to cool.

Leave the cake in the tin and allow to cool on a wire rack for about 20 minutes. Take it out and allow it to cool fully. I popped this into the fridge over night as the recipe directed and then sliced it cold. I much preferred it at room temperature, so wouldn't bother with the fridge part. But that is up to you...


This book is just wonderful to read through. The tidbits of information as to why things are done a certain way, were just old worlde delightful. But in my current real world terms, not very time friendly.

I have skipped a few steps in the book and left out a few ingredients because I didn't have them to hand. I am sure, the cake made to the exact specifications would have been truly amazing.

This cake was fabulous. It was dense and soft and had all the traditional charm of an Irish fruit loaf. A thick slice toasted and smeared with some real butter made a delicious on the go breakfast. Another one in my cake-for-breakfast category.


Have a gander at what my other lovely baker buddies made.. I think we've got another good year ahead of us!


27 October 2015

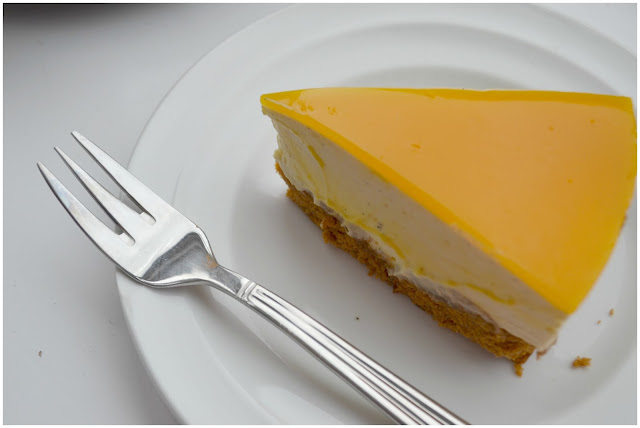
Mango and Ginger No Bake Cheesecake


I should really fill you in, before you even read on any further; that this cheesecake is made with cake. An actual cake base, not biscuit. Cake.  

I don't like cheesecake with a biscuit base. Unless it's a baked cheesecake. I know that might sound mad, but I just think no bake cheesecakes are all kinds of gross if they have a biscuit base. 

I love the cheesecake toppings of a no bake. Just not the usual biscuit bases... You feel me? I just don't like them!  I will always, when I can, substitute the bottom of the cheesecake with a sponge type bottom. Red Velvet Cheesecake, Vanilla Cream Mascarpone Cheesecake, Baileys Chocolate Cheesecake and now Mango and Ginger Cheesecake... you get the idea.

It's also a no make, no bake, you just putting together ingredients kind of recipe so in all fairness, this could not be any easier! You buy a few small, readily available ingredients and bobs your uncle, you have a cheesecake. It's domestic god/goddess at it's finest and you really won't have lifted a finger!


Mango Cheesecake with a 
Mango Mirror Glaze on a Ginger Cake Base

Start off in the supermarket and grab yourself the following ingredients;

2 loaves of ginger cake
2 tubs of cream cheese
250ml single cream
1 vanilla pod
60g caster sugar
1 250ml bottle of mango puree
1 tsp from a sachet of gelatin powder
1 tbsp hot water

Cut up the two loaves of ginger cake and squash them into the bottom of an 8 inch round spring form tin.
Whip the cream cheese together until smooth and add the cream and vanilla seeds from inside the pod. Add the sugar and whip until soft and light. Be careful not to over whip. 
Fold in half the bottle of mango puree into the cream/cream cheese mixture until fully incorporated.
Pop half the mixture in on top of the ginger cake and smooth it out. Add the other half in and smooth out the top as best you can.
Put the pan in the fridge for at least two hours, or until set. Over night is best.

After about one hour, the cake should be firm enough to hold the mango mirror glaze.
Add one tablespoon of hot water into a bowl and sprinkle in the gelatin powder, stir around until it's fully dissolved. If it doesn't fully dissolve put the bowl into a hot water bain marie, and keep stirring until it does.

Pour in the rest of the bottle of mango puree into the dissolved gelatin and give it a quick stir. Pour that mixture than straight on top of the cheesecake mixture and smooth it out evenly.

Put the whole thing back in the fridge to set up, again, over night is best.


Removing the cake... 

To remove the cake from the spring form tin. Put a sharp knife under some hot water and run arounf the edge of the inside the tin, before popping the clasp. The cake will come away much cleaner from the sides.


The Great Irish Bake Off has started up again and this year I have a  friend baking in the tent. I got to know her through my own time on the Bake Off in Season 2 and I was delighted to see she got off on a very good start the other night!! This week was desserts, and the technical challenge was a very persnickety gelatin infused, biscuit baked, no bake mango and something or other (I really can't remember!!) cheesecake.

On account of my dislike for biscuit bases, I refused t follow the recipe exactly but have paid homage to the mango in the recipe above. So it's almost the same thing right? A no bake, cheats make, cheesecake that is genuinely great!!

One to pull out for the next dinner party... You're friends will love you for it!!


23 October 2015

Green Tea and Pistachio Bundt


This week.. let's see.. Oh wow! That was some week. 

It started with green tea donuts. Fail. Then double chocolate macarons. Fail. 

And I really did not feel like baking anything else. Because, well see I just can't handle my entire kitchen and cupboards of ingredients conspiring against me! But I remembered I had to bake my last cake with my lovely group The Cake Slice Bakers.. This month is the last month of our book, The Southern Cake Book, and it was a free choice. I remember there being a matcha bake way back when as a choice, and figured since I bombed on one matcha bake this week.. why not make it a two for.

Just feeling incredibly sorry for myself in case you hadn't figured.. Self pity party, table for one.

But then this one worked... and I was very happy with it! Well as happy as one can be after the realisation I forgot to marble it.. ooops! I also didn't have the required ingredients for the glaze that the book called for so made a vanilla sugar glaze and loaded it with yummy pistachios! But it did restore my fate in myself as a baker and as I went to take pictures...

Champ got sick. And I got sick and now I am back to feeling super sorry for myself and have nothing but a few photos on a bake I can no longer taste thanks to my smashing new head cold!

Can we just write this week off and start fresh after the bank holiday on Monday??


Green Tea and Pistachio Bundt 
adapted from The Southern Cake Book's Green Tea- Honeysuckle Cake pg 205

225g soft butter
575g caster sugar
60ml honey
6 large eggs at room temp.
675g self raising flour
1tsp baking powder
1/2 tsp salt
125ml buttermilk
2tsp green tea (matcha) powder
1 tsp vanilla
250g icing sugar
60ml milk
100g chopped pistachios

Preheat the oven to 160C/325F or Gas Mark 3. Grease a bundt pan with butter and flour until coated. Tip out any excess flour.
Beat the butter until creamy and slowly add the sugar until light and fluffy. Add the honey and mix until just blended.
Add the eggs one at a time, mixing a little after each addition.
Sift the flour, baking powder and add to the butter mixture in batches, alternating with the milk.
Fold in the matcha and combine until blended through.
Bake for at least one hour to one hour 15, on the middle shelf, until a skewer inserted in the middle comes out clean.
Cool the cake completely in the pan on a wire rack. When cool, remove from the tin and poor over the glaze.

Make the glaze:

Add the vanilla, milk and icing sugar to a pot and allow to melt together over a low heat, until just heated. Pour immediately over the cold, turned out cake and sprinkle with the chopped pistachio.


Want to check out what the rest of the bakers choose as their final bake.. Have a peek at the linky below.. BUT also come back next month, for our new book reveal!! It's such a pretty one...


18 October 2015

Pumpkin Spice Apple Pie


Autumn is always in-my-comfort-zone time for me. 

You know how the dreaded bikini-body season is over and the wrap me up into a squidgy ball of layers season has begun. My kitchen gets stocked up with lovely, hearty flavours. Spices, sweet and savoury begin to appear on my shelves and using just a smidgen of some of them propels my senses into a world of longer nights, cozy fires and hearty suppers.

You don't get that in bikini season. Bikini season (that 3 days of sun between April and August!!) shuns you for liking cream or meringue, or, or um... cream with meringue. Bikini season really sucks. It's why I try to ignore it.. and it's why I stick to shoes! Shoes and I, we got a thing. Shoes will never make my bum look fat! And as for Autumn shoes.. well you've got boots.. and pudgy, squidgy toes in warm toasty socks to fill those boots. It's the best season. 

The American's have this thing called Fall.. It's like our Autumn, but not really. They are consumed by pumpkins and changing leaves and taking pictures of beautifully decorated porches with rich harvests. I guess because they get more than the one and a half seasons we get.. they celebrate them all. 

It makes me so jealous. 

But they do share their ideas with us, so that's always nice! And they have this thing called "Pumpkin Spice" and it comes out in Fall. If Autumn has a smell.. this is it. If Autumn has a taste this is it. And best of all, it's super simple to make yourself. Not to mention cost effective. 


Pumpkin Spice

3 tbsp cinnamon
2 tsp ground ginger
2 tsp nutmeg
1 1/2 tsp mixed spice
1 1/2 tsp ground cloves

Add the above spices into a jar and mix. It's that simple. I use a twist cap kilner jar and it makes about about half a jar full. Use the pumpkin spice as required in your recipe.


 All Butter Short Crust 

240g plain flour
50g icing sugar
150g diced cold butter (+ a little extra for greasing)
1 large egg

Preheat your oven to 180C, 350F or gas mark 4.
Put the flour, butter and icing sugar into a food processor and blitz until looks like breadcrumbs.
Crack in the egg and bring together until a soft ball forms.
Wrap in clingfilm, pat down and leave in fridge for 30 mins.
Grease up a 9/10 inch round pie dish.
When it comes out of the fridge, split into two balls, one slightly larger than the other and roll out. 

Pop the larger circle into your pie dish and then if you are so inclined blind bake the pastry case bottom using pastry beads in a pre-heated oven for about 10- 15 minutes.


Apple Pie

6 large Bramley's fit my 10 inch dish. Skin the apples completely and then just chop them into however you feel... I like to do a rough slice and just keep slicing through the apple until I reach the inner core.

50g white sugar
60g brown sugar (I used demerara)
1 tablespoon pumpkin spice

Fill the pastry case with the apples and top with the remaining pastry. Bake for about 30-40 minutes, depending on your oven and minding the top doesn't get too brown. Allow to cool slightly on a wire tray upon taking it out of the oven.

Serve as you see fit.. or save it all for yourself. 


Tell me... What does your Autumn taste like?


12 October 2015

Black Tea Sponge with Honey Buttercream and Blackberry Jam


Things I noticed...

The leaves have lost their summer green glow. The autumn hues of red, browns and gold are in abundance and some of the trees have started to loose their leaves. But the sun is beating down, big and bright? It's that weird weather where you need to bring a jacket with you in the morning. But if you're still wearing it at lunch, you will get heat stroke. Having said that, the back garden has relished the sun and rain mixture and has grown wild and of it's own volition these past few weeks... and while it's a disaster to look out upon, has grown a fine abundance of blackberries.

That were quickly gobbled up by every blackbird in the country and I got about 8 good ones.

I clearly needed more for the jam and while I am all for the experience of blackberry picking, I didn't get the time and bought the bloomin' things in the supermarket. Yes.. YES... I know they are free from every bush by the road and ditch but I just didn't get the chance to go picking. You have to leave me off this one...

Now unless you've been living under a rock; you'll know that the Great British Bake Off is over.. Nadyia won and in the next few weeks or so, the Great Irish Bake Off is due to air. It's an entire autumn/winter of baking. I can't believe it. I opted to bake the Showstopper as my final entry into the Great Bloggers Bake Off with the lovely Jenny from Mummy Mishaps.

The premise was, three cakes that are quintessentially British. Not being British, I hadn't a breeze what was quintessential so I scribbled down what "British" was to me.

It wasn't much to be honest.. we share a lot of things in common, but The Queen, cricket, red telephone boxes, Victoria Sponge, Mrs Patmore and tea came out on top. Out of those, the following cake was born...


Soft Set Blackberry Jam (I made this up and it worked out!)

250g blackberries
125g sugar
2 tablespoons of water
1 teaspoon cornflour

Put the cornflour into the water and mix through. Put all of the ingredients into a pot over a medium heat and all to simmer down into a mush. Give it a few stirs every now and then. Allow to cool and thicken.


Black Tea Victoria Sponge

I made three cakes here. The recipe below provides enough for ONE, two layered Victoria Sponge. If you want to do what I did... I double and a half-ed it.. (If you get me?)

Prepare two 8 inch cake pans and pre-heat your oven to 180 C/350F or Gas Mark 4.

125ml of hot milk
Contents of three teabags
225g soft butter
225g caster sugar
40g plain flour
210g self raising flour
1 teaspoon baking powder
4  eggs at room temperature

Heat your milk in the microwave until hot but not boiling.
Add in the contents of three teabags and stir up. Allow to cool. The longer you leave the tea to infuse, the stronger the flavour.
Cream your butter and sugar until light and fluffy. 
Dry whisk the flours and baking powder together. 
Add the eggs into the butter/sugar mix, one at a time and mix until the yolk has disappeared. 
Add half the flour to the mixture, then the milk and then the rest of the flour. Be careful not to over mix as you want it to stay nice and light and fluffy!
Divide the mixture between your two tins and pop into a pre-heated oven for 25-35 minutes or until golden on top or your cake tester comes out clear.
Allow to cool in the tins for about 5 minutes, before turning out onto a wire rack and cooling completely. 


Honey Buttercream Frosting

225g soft, unsalted butter
500g icing sugar
60ml honey

Beat the butter for a few moments until very soft and pale.
100g ish.. at a time, add in the icing sugar until completely mixed through.
Fold through the honey and leave to one side at room temperature until you are ready to frost your cake.

Putting it all together...

Sandwich the two layers of your cake together with some jam and buttercream an continue to cover the outside of the cake with another layer of buttercream.

Any left over jam... Lick it straight off the spoon, pop it on your morning toast or dip in a bread stick of two. You could put more on the cake too... I am simply providing you with options!


Clare and her absolute dote, Jacob are hosting the finals this week! Jacob is a junior baker, and his lovley Mummy Clare helps him write the blog! Be sure to stop by and see the other bakes the rest of the bloggers chose as their final entry!! It's going to be a tough choice for Jenny I am sure!

If you follow this link here... you will get all my blog posts for this years Great British Bake Off blog along! I had so much fun baking with such a talented group of bloggers.

I won Star Baker for my Croquemebouche Cupcakes and my Irish Cream Chocolate Tart. Here's hoping my Victoria Sponge can get me through finals!!


Copyright © Procrastibake | Theme by Neat Design Corner |