20 March 2017

Banana Bread and Cream Cheese Frosting


For all of you who are new here, let me just introduce to you what happens round this time every month (and also do a little happy dance and extend the warmest of wishes and hellos that you are even here in the first place!). The Cake Slice Bakers are a group of bake loving maestros who choose a book and bake cakes from said book.  

This month is no exception... March has just flown by and in a frenzy of wedding cakes and birthday cakes and all other bakes, the choice for this month had to be simple! World Class Cakes by Roger Pizey is just  a wonderful book to bake from with different skill levels catered for on every page. While I thoroughly enjoy the idea of challenging myself, March was not the month for that. 

Thus the humble, yet spectacular Banana Bread was baked. I made two minor adjustments to the recipe, one because I didn't have the ingredients to hand and two because I seriously love the Cream Cheese Frosting from the book and thought it'd make a fab pairing with this recipe. Even with my adjustments the bake was a huge success. One taster remarking it was 'the best thing ever' and 'are you going to finish your piece, or will I?' (after his third piece)!!!

Needless to say, there is no excuse for not using up your ripe bananas in what is the easiest bake ever and then enjoying said bake with a big vat of tea, throwing your feet up on the sofa and regaling in your baking prowess.  


Banana Bread- 
adapted from World Class Cakes pg 65

125g soft butter
125g caster sugar
2 large eggs
225g self raising flour
50g ground almond
1 tsp baking powder
1 tsp baking soda
125ml butter milk
2 ripe bananas mashed

Preheat your oven 180C/350F or Gas Mark 4.
Line a 9 inch square pan with some parchment.
Mash the bananas in a bowl.
Add the sugar and butter into bowl and mix with an electric mixer until pale and creamy. Add the eggs and mix. Whisk the flour, ground almonds, baking powder and baking soda together and add to the wet mix. Fold through.

Add the milk and the mashed bananas and mix until fully incorporated. Transfer to your pan.

Bake in your preheated oven for 30-40 minutes, until the top is golden and crusted or a skewer inserted in the middle comes out clear.

Allow to cool in the tin for at least 15 minutes, before removing to a wire rack to cool fully before slicing.

Cream Cheese Frosting 
260g icing sugar
80g unsalted butter, softened
40g cream cheese

Beat together the butter and cream cheese. On a low speed add in the icing sugar, a small bit at a time. 

Mix on medium speed until it comes together. (You could add a little milk if you’ve reached a too stiff consistency.) Keep on mixing until soft and fluffy.

Once the banana bread has cooled, cut them up and swirl on the cream cheese frosting in a zig-zag pattern over each bar.  


I used an 8 inch tin when I made my banana bread bars.. and had enough for four cupcakes also.

I baked up the cupcakes as you normally would, rough chopped 5-6 stalks of rhubarb and stewed it for a few minutes until soft and gooey in 4 tbsp of sugar and 1 tsp of vanilla.

Once the cupcakes had baked and cooled, the rhubarb had cooled and I had opened a carton of store bought custard.. I layered the different components together in recycled yogurt jars. I had enough cupcake crumbs from one cupcake to use in one jar. Seriously easy way of using in season ingredients and making something so much more entertaining!


Need more baking inspo?? Seriously.. you couldn't get any better than the guys and dolls of The Cake Slice Bakers!


17 March 2017

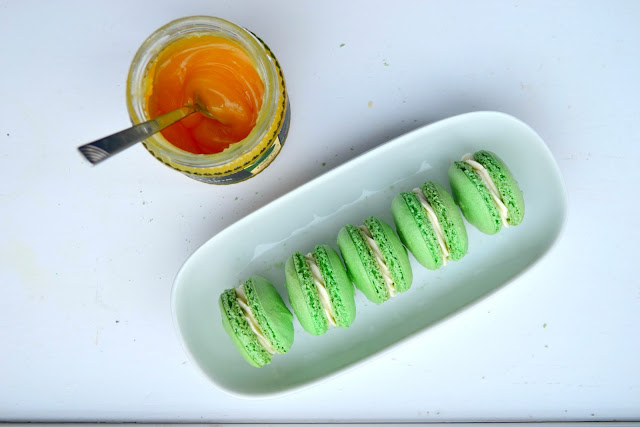
Saint Pat's Macs...


Never in a million years would I have called St Patrick's Day, St. Pat's but anything more that St Pat's Macs didn't have the same ring to it, you know!

I was messing about a few weeks back with Swiss Meringue Buttercream and though I needed to pair it with something nice. My boy had asked would I make him macaron. He doesn't like the cream fillings but does go through a fair amount of the shells and I figured, the green macaron, the jar of store bought lime curd I had in the fridge and the coconut SMBC would pair up nicely. And I was right. The lime cuts through any major sweetness in the buttercream and the buttercream itself helps keep the whole mouthful light, soft and silky.

Nothing too traditional here this St Patrick's Day but we are never ones to go exactly with the grain!


Green Macaron Shells

115g ground almonds
230g icing sugar 
140g egg whites, large free-range, room temp
70g caster sugar
pinch of salt
drop of green GEL food colouring

Pre-heat your oven to 140C/280F or Gas Mark 3.
Pulse together the ground almonds and icing sugar in a food processor, until very fine. If any big lumps remain, sift the mix through a sifter and set to one side.

Place egg whites, sugar and salt into a super clean bowl and whip with a whisk attachment on low speed (that’s 4 on my KitchenAid) for 3 minutes. It should look like foam by the end bubbly  and frothy.

Increase the speed on the mixer to medium-high (it’s about a 7 on my Kitchen Aid) for another three minutes. It should start looking like shaving foam. Finally increase the speed to high (which is an 8 on my KitchenAid) for another 3 minutes. It is going to really stiffen up and clumps into the whisk attachment.

Add in the gel food colouring and whip at the highest setting for another minute **Remember, by now if you have not reached a stiff meringue, dump the eggs  and start over with new egg whites and a washed clean bowl.**

Pop the dry ingredients into the meringue and using a rubber spatula gently fold the meringue in through the dry mix.

Use circular folding hand movements, bring in the meringue from the sides of the bowl through the powder mix and through the middle of the bowl. You will need a maximum of 25-30 folds. Stop after this, even it’s still a little lumpy.. it’s ok.

Fill up a piping bag with a couple of spoons on the batter and pipe circles onto parchment lined baking trays in small  discs with gaps of about 3-4 cm in between each.

Lift up the tray once piped and tap it against the counter tops twice, turn the sheet and give it another two good whacks. Pop the trays someplace warm and let them form a skin for at least half and hour. They should be dry to touch before you put them in your oven. Once dry, bake for 12-14 minutes.

They’ll be done when the tops have crisped up and you can gently wiggle them from side to side on the parchment.

Once baked, pull them out and let the shells cool on their trays until cold. Gently remove and fill with your favourite fillings.


Coconut Swiss Meringue Buttercream 

280g granulated sugar
454g very soft unsalted butter
6 large egg whites
1 tsp coconut essence


Place the egg whites and the sugar into the bowl of the mixer and give it a good whisk. It will be thick and gloopy but will thin out as it is cooked. 
Using a double boiler method, over simmering water, heat the mixture until the sugar has dissolved is hot to touch and the mixture is silky to feel, it should reach 130F on candy thermometer.
Remove from the heat and whisk on a medium speed for about 5 minutes.
Move to a faster setting and whisk until think and glossy and stiff peaks form like that of meringue. This should take about 6-8 minutes.

Reduce the speed and add the very soft butter, a spoonful at a time. It will curdle, and this is ok, but just keep mixing until it is smooth. Add the coconut and keep whisking until soft and silky


Fill one shell of each macron pair with a swirl of buttercream and top with a dollop of lime curd. Sandwich the top of the shell onto the cream and curd and hey presto.. St. Pat's Macs are ready to go! 


Happy St. Patrick's Day to all my family, friends and to you my lovelies! 

Thank you as always, for stopping by and gracing this little corner with your presence. I hope that whatever part of the world you are in, it's green and happy and that the luck of the Irish spreads your way!!

16 March 2017

Beer Batter Cupcakes


Apprehension aside, due to the Irish affliction of not being able to talk positively about your accomplishments without someone commenting about your notions... These cupcakes tasted AH-MAZING!!!

I was totally blown away by the malty, toffee flavour of the ale left over after baking. Not something you usually get when adding pale ale, or light beer to a bake.. my experience has been that the flavour dulls or tends to evaporate altogether!

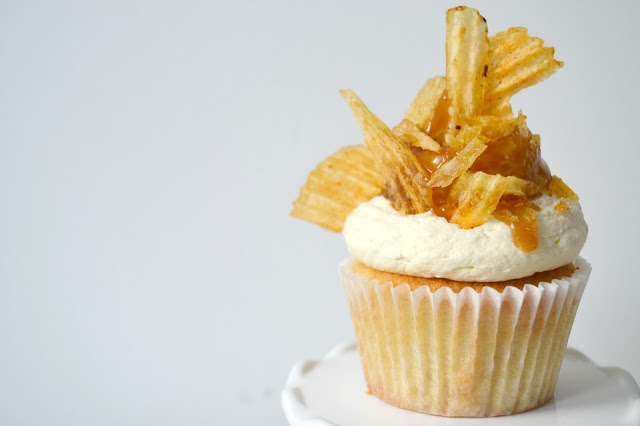
When tasked with making treats for Super Saturday, the last weekend of the Six Nations, I thought about what folk usually consume when watching sports. Beer and crisps is honestly my go to and possibly the best I could do given my zero interest in sports in the first place. But dwelling on the beer and crisps notion.. I thought why not combine them into a cupcake. Because who doesn't like cupcakes??

Am I right??

Aldi have some really great craft beers in store and I really enjoyed the Dungarvan Brewing Company's American Pale Ale. Being a major fan of Aldi's Okey Dokeys crisps I thought I would lash the two together and see what I got. Re-imagining my own tried and tested very vanilla cupcake recipe, I added the ale and much to my (and literally everyone who tasted them) delight, that malty, toffee undertone stayed true. The beer offset the sweetness of the buttercream and added a nice counterbalance to the bacon flavour of the crisps.

These cupcakes worked out a charm.


Beer Batter Cupcakes 

125g of room temperature butter
225g caster sugar
275g self raising flour
A half a teaspoon of baking powder
2 large free range room temperature eggs
125ml buttermilk
125ml Dungarvan Brewery American Pale Ale

Preheat your oven to 350F/180C/160C fan or Gas mark 4. Line a 12 tray cupcake pan with cases. (I used a 6 tray and made mini donuts for decoration with  my left over batter!)

Cream your butter and sugar until light and fluffy and pale. Add in an egg, one at a time until the yolks have been incorporated.

Dry whisk or sieve your flour and the baking powder together. Add half your dry ingredients to the butter/sugar/egg combination and then half the buttermilk. Mix until combined and repeat. Be careful not to over mix the batter here as you want them to stay light and fluffy. Just make sure all the ingredients have been mixed together.

Fold through the beer, gently.

Fill your cases to two thirds full. Bake for 20 to 25 minutes. You know they are done when the tops are golden, have a slight spring in them when you gently push down or a skewer inserted in the middle comes out clear!

Allow to cool on a wire rack until cold and ready to be used. 


Toffee Sauce

Cook 125g butter and 180g of dark brown sugar in a medium non stick pan over a medium heat for two to three minutes, until the butter has melted and the sugar has dissolved.
Whisk in 200ml of double cream and bring the entire thing to a light boil, stirring constantly.

Turn off the heat and allow to stand until it's cooled slightly, stirring often.


Toffee Buttercream

225g soft, room temperature, unsalted butter
500g sifted icing sugar
up to 60ml cream/whole milk
few tbsp of toffee sauce to your taste

Using an electric mixer, beat the butter on high until it is very soft and pale. (TIP: pop the butter in the microwave for a few seconds until very soft.)
Add in the icing sugar a few cups at a time.
If the buttercream is very thick, add a tablespoon of cream or milk in until the desired texture has been reached. 
Add a few tablespoons of the toffee sauce.

Mix the whole until light and fluffy. The faster and longer you mix this, the lighter and fluffier it will be. 

Once the cupcakes have cooled and the toffee sauce thickened, pipe the buttercream on in mounds. Garnish with a drizzle of the left over toffee sauce and sprinkle on some bacon flavour crisps. 

Honestly the beer, crisps and sweet combo work really well here! Try it.. you won't regret it!


***Disclaimer: Sponsored Post*** 
Aldi very kindly, provided me with the ingredients to bring this post together.
All comments and views however, are completely my own.

14 March 2017

Roll Ups... Pizza Dough Roll Ups.


You know I am all about homemade here but sometimes I like to cut corners, claw myself back a little time to spend day dreaming and drinking tea. This shouldn't come a surprise to a lot of you with busy lives... you know those days that seem to go on forever and no matter what you do, you get nothing completed? Yeah.. on those days I like to cut corners where I can!

So with the 6 Nations finals and all you fine folk being the busy bees that you are... Aldi asked me to come up with some treats for you. Now... to be perfectly honest I have no real, sports like inclinations. No idea who would even be playing a match on any given day but I sure as heck know how to feed people. So if you are looking for something quick and fun to throw together and snack on while you watch Ireland (hopefully) beat the crap out of England (or to be PC about the whole thing... vice versa) then I think I have come up with just the ticket. 

Honestly it cannot get much easier than this. 

A pizza dough base, a handful of ingredients, a preheated oven and bobs your uncle you will have made Pizza Roll Ups. With little to no baking or cooking experience required, you are going to look like you have got it all going on! And better yet, with variety being the spice of life, you can alter the ingredients to suit your own pallet... A win-win if you ask me... Even if your preferred sports team loses!


Pizza Roll Ups

1 pizza dough roll
1 jar of pasta sauce
1 packet of cheese strings (8 sticks halved to give 16 mini sticks)
1 packet of pepperoni (each slice cut into quarters)

Preheat the oven to 350F/180C/160C fan or Gas Mark 4.

Roll out your pizza dough, from the package and set to one side. Line a baking tray with some parchment paper. Using a sharp knife, cut the pizza dough into even triangles. I cut mine in half on the long side, then into four and then halved each 1/4, giving me 16 triangles.

Separate the triangles and paint a thin layer of pasta sauce onto each one. Layer with some pepperoni and a cheese string half, then, tucking in the sides, roll up the pizza dough (almost into a croissant shape).

Secure any open gaps by pinching the pizza dough together.

Pop each roll up onto the prepared baking tray and bake in the preheated oven for 15-20 minutes until golden.

Eat warm dipped into some garlic mayonnaise or cold as a snack on the go... Both ways taste great to me!


You could fill the Pizza Roll Up with whatever toppings you like and to make it even more cheesy and gooey why not try sprinkle some Mozzarella in there in lieu of the cheese string. A more sophisticated version  maybe? You tell me.. the variations are endless!

There you go... didn't I say it would be easy? Snacks all set up and ready for you to enjoy, whatever the occasion!

***Disclaimer: Sponsored Post*** 
Aldi very kindly, provided me with the ingredients to bring this post together.
All comments and views however are completely my own.

08 March 2017

Green Ombre Layer Cake


Given that Saint Patrick's day is on the horizon, I thought it might be nice to share a cake, simple in it's virtue but packing a nice punch once cut open. This ombre layer cake, named because each cake layer is a shade, gradient lighter or darker than the next, is the perfect way to celebrate in style this feast day. 

A cinch to whip together, the cake is subtly flavoured with white chocolate and Irish Creme. Avoiding the heaviness of a traditional fruit cake or chocolate and Guinness, the light airy sponge complements the soft, fluffy frosting. Dressed in common garden variety ivy, it makes a happy center piece to your dinner party table. 


White Chocolate Green Ombre Cake

250g salted butter
450g caster sugar
525g self raising flour
4 large eggs 
250ml buttermilk
2 tsp baking powder
100g white chocolate, melted
Green GEL food colouring

Line 4 8 inch cake tins with parchment and leave to one side. If you only have two, cut out 4 parchment circles and put two aside.  Preheat your oven to 350F, 180C, 160C fan or Gas mark 4. 

In a bowl cream your butter and sugar until light and fluffy and pale.
Add in an egg, one at a time until the yolk has disappeared. Then add the next, scraping down the sides of your bowl.  


Dry whisk or sieve your flour and baking powder together.
Add the white chocolate to the egg/sugar/butter combination.
Add half your dry ingredients to the butter/sugar/egg/vanilla mix and then half the buttermilk. Mix until combined and repeat. Be careful not to over mix the batter here as you want the layers to stay light and fluffy. The buttermilk helps with that too. Just make sure all the ingredients have been mixed together.


Separate the batter into 4 bowls and colour each bowl with the green food gel. Try and keep the gradient of colour a shade off the last bowl if possible. Transfer the green batters to the tins and bake in a preheated oven on the middle shelf.

Bake for 20 to 25 minutes. You'll know when they are done as the tops are golden, have a slight spring when you gently push down on the top or a skewer inserted in the middle comes out clear. Allow to cool in the tins for about 10 minutes, then turn out onto a wire tray and allow to cool fully before filling. (If you need to reuse your tins, give them a quick wash out before you use them again).


Irish Creme Buttercream

330g soft, room temperature, unsalted butter
550-600g sifted icing sugar
60ml of the Irish Creme, or to your taste

Using an electric mixer, beat the butter on high until it is very soft and pale. (TIP: pop the butter in the microwave for a few seconds until very soft.)
Add in the icing sugar a few teacups at a time.
Add a tablespoon of Irish Creme in until the desired taste has been reached, you might not need all of it. 


Mix the holy moly out of it until light and fluffy. The faster and longer you mix this, the lighter and fluffier it will be.

Once the cake layers are cool, sandwich each layer with a good helping of the buttercream, Finish off the sides and top of the cake with the left over buttercream. Decorate or garnish your cake with some ivy or even shamrock... given the week that's in it!

Enjoy at room temperature with your favourite coffee. 


Copyright © Procrastibake | Theme by Neat Design Corner |